Saturday, April 29, 2006

A First


Well today was the first time I actually tried to take real photos of someone besides Jonathan or Jerry Bear. I took some photos for my sister and her fiance. I did all of the shoot in manual so YAY for that! I posted a few of my favorite shots in my gallery, so tatke a look and give me some feedback if you're interested. I'm very green at all of this, so I know I have a long way to go. I just have to decide what I need to focus on first. I think getting faster with the manual controls may be at the top of the list, but I need to be thinking about composition stuff too. I'm pretty happy with some of the results, and I just wanted to share.

Oh , and she'll kill me for putting that one up there because she didn't like those!

Thursday, April 27, 2006

Cherry Arte Goodness

I am in *L*O*V*E* with these papers,but I have just about used up all of my stash. I definitely want to get my hands on some of the new stuff. It's even prettier. In the past I have put off submitting DT applications until the last possible minute, partly because I am a chronic procrastinator, but mostly because I would sit around and analyze things way too much. I decided a while back that I wasn't going to enter any more of these things unless it was one that really got my mojo going, and I felt comfortable with. Well, this one just fell together with little effort and lots of FUN!! So I held onto it for a little while, and I finally just hit send. Now I want to share what I have been working on--what has kept me away from my new scenic route papers. *GASP* You know it's serious now. I ended up with 5 layouts and 2 projects to choose from not counting the ones I had already submitted for their gallery, but I'll just share the ones that made the cut.

These are papers from the Bolded line.


These papers are from the Basic Blue. I should have gone over with more stitching, but my sewing machine gets offended when I use it for paper. Grrr...


These are from the Boys Boys line. I love how the band-aid pops in this one!

This last one is a mini book that I made using those little plastic thingies made for holding IDs and badges. I made the covers out of chipboard and put it all together with binder rings. You've gotta love office supplies!!

Tuesday, April 25, 2006

A Happy and a Train Wreck

First, the good news. I will be a guest designer for the month of May at www.expressionsbythemonth.com It is a faith-based monthly kit club, and I am so excited to have this challenge!

Now for my train wreck. I am just spilling it all here and now by showing everyone how scrapping can get ugly! I am actually pretty disappointed in this because I L*O*V*E*D the original design. Lesson: make sure you order extra sheets of paper just in case--and have extra letter stickers on hand. Anyway, I will have to hunt down the supplies, but I am determined to recreate my original design since I couldn't save the layout.


The original design had just the photo, buttons and journaling block on the whole sheet of AC paper. The title was similar but with black AC letters directly on the background. Anyway, somehow I screwed up the title and managed to make a hole in the background paper, so I tried to save it. That's when I realized that the photo was stuck down crooked and I had already glued the bittons down. Ugh.... It's kind of disappointing, too because I wanted the layout for this photo to be pretty simple, and continuing to add schtuff didn't help that. In the end, I didn't even bother to make the journaling straignt. Well, you win some...you lose some.

Sunday, April 16, 2006

Share Day

I guess I have a lot to say and not much all at the same time. I decided I won't bore anyone, but I did want to post some of what I was able to get done with no kiddo last week.

Here's a fun Junkitz one. It's not quite as funny when you can't read the shirt, but the shirt he has on in the photo says, "My grandparents' don't spoil me. They're just very accommodating."


The next one is my layout for 1 Peter chapter 5. I sort of skipped chapter 3. I have a LO idea and everything. I just haven't been able to get the photo I want yet. I have another idea for chapter 5, but I think I'll put it in my art journal. I think it will involve a poppet-like me and an abstract lion.


Here's some more fun Cherry Arte. I put these papers away for a while, but I need to get a move on now because the DT applications are due at the end of April. It's a long shot, but I'm jumping in anyway.


Well, that's pretty much what I have done this week. I really need to go through my stuff again next week and pull out some stuff to get rid of. I hope I'll have my secret bunny package to post the goodies soon.

Wednesday, April 05, 2006

Superstar K

The time is coming for the secret bunny festivities to get in full swing! I am taking the chance of posting this here assuming that my secret bunny doesn't wander to my blog. I am still thinking of a fun way to send her out to follow clues to reveal my identity.

Anyway, I had picked up this little shadow box to try out some stuff for J's room. I thought about it, and I decided to make a Superstar K for my secret bunny. It will be delivered to her along with her goodies very soon, so if any of you figure out who she is, don't tell! Sssshhhhh!


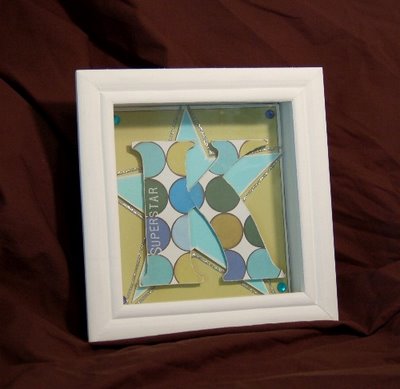
I used white acrylic paint to paint the box and the striped Christina Cole to cover the outside edges. Can you tell I've found a renewed love of that little slab?
I hand cut the K out of chipboard, traced it onto the circle paper and cut out the shape. I adhered the paper to the front of the chipboard and sanded the edges. I added the word Superstar with AL rubons.
I drew the star out on the back side of the cardstock and then cut it out. I swiped the edges with white paint. I matted the green HS cardstock on top of a white piece and then adhered the star with mini pop dots. I drew another star with the silver glitter Keepsake Colors paint from Plaid and let it dry.
I adhered the K on top of all of this with more mini pop dots, and added some rhinestones to the corners. I had to slide it all through a slit in the top of the box and then slide the glass panel back in. It took a little while to do all of this because of all the painting and adhering with gel medium, but I like how it turned out.
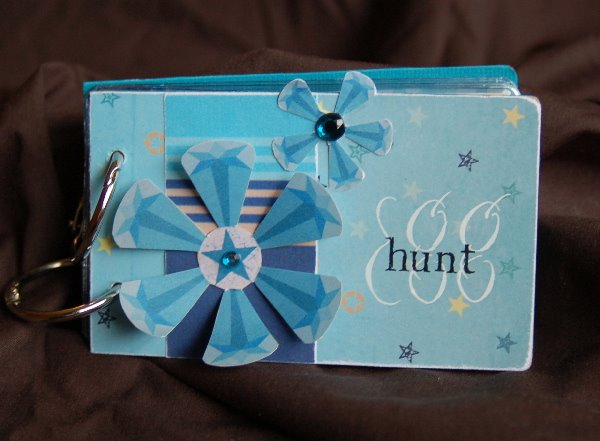